 remygame.com
Master Class in Berserker Combat: How to Calibrate, Frame-Cancel, and Execute Lethal Adamantium Combo Loops in Marvel’s Wolverine

Insomniac Games’ Marvel’s Wolverine shifts the action-adventure combat paradigm away from graceful, fluid web-swinging acrobatics and thrusts players into a visceral, brutal arena governed by raw kinetic momentum, real-time directional dismemberment, and high-risk parry mechanics. True mastery of Logan’s combat kit does not come from button-mashing the basic light attack input, but from treating his adamantium claws as high-precision instruments of continuous pressure. The game’s combat engine relies on strict frame-cancel windows, trajectory manipulation, stance-switching transitions, and aggressive healing loops tied directly to damage output. Beginners who approach skirmishes defensively often find themselves overwhelmed by armored elite mercenaries and agile mutant hunters, while expert players leverage Logan’s berserker state to dominate the battlefield with unbroken combo chains.
To consistently execute high-tier combat sequences across maximum difficulty settings, players must master a hyper-specific mechanical discipline: seamless adamantium combo looping and kinetic cancels. A single miscalculated dodge vector or an un-canceled heavy recovery frame leaves Logan vulnerable to point-blank shotgun blasts, stun batons, and heavy suppression fire. This technical combat manual breaks down the exact frame data, controller inputs, enemy animation cues, and spatial management techniques needed to transform Logan into an unstoppable weapon. By following the systematic phases detailed below, you will learn how to weaponize Logan’s healing factor, string airborne juggles, break heavy armor guards, and sustain absolute arena control without breaking your combo multiplier.

1. How to Calibrate Input Latency, Camera Vectors, and Core Parrying Frames
Before entering high-density encounters in Marvel’s Wolverine, you must optimize your system settings and controller responsiveness to match the tight frame requirements of high-level melee execution. Insomniac’s combat engine calculates parry windows on sub-second thresholds; a delay of even three frames can convert a successful counter-attack into a devastating shield-bash hit. Access the display menu and enable Performance Mode (targeting a locked 60 FPS minimum) to double the rendering refresh rate. This doubles the visual feedback frames for enemy attack wind-ups, granting you twice as much time to read incoming visual cues and execute frame-perfect counters.
Camera configuration plays a crucial role in maintaining fluid spatial awareness during chaotic multisided brawls. Set your Camera Distance to Wide and turn off Auto-Center Camera to prevent the view from snapping wildly during high-speed directional dashes. In Marvel’s Wolverine, Logan automatically targets enemies based on a combination of left-stick directional tilt and camera center-line vectors. Adjust your Target Lock Retention to "Hybrid" and lower the Target Assist Strength to 30%. This prevents the system from locking your claws onto a low-priority grunt when an armored elite is actively winding up an unblockable attack from your blind spot.
Mastering the primary Parry Frame Window forms your absolute core defense-to-offense bridge. Unlike standard block mechanics, Logan’s parry relies on a precise micro-tap of the parry button exactly 4 to 8 frames before an incoming melee swing or projectile connects. When performed correctly, time briefly slows down, exposing the attacker to an instant adamantium counter-strike. Practice identifying the flash of orange light on an enemy weapon—the universal indicator for a parriable swing—and delay your press until the weapon begins its forward kinetic acceleration rather than reacting during its initial backswing phase.
2. How to Master the Adamantium Light Slash: Mechanics of Light String Buffering
The core foundation of Logan’s offensive arsenal is his Light Slash combo chain—a rapid four-hit adamantium assault designed to lock standard enemies into hit-stun animations. However, simply tapping the input four times produces static, non-cancelable animation end-lag that leaves Logan wide open to flank attacks. To turn this standard combo into a continuous pressure tool, you must utilize "Input Buffering," queuing up your second and third light inputs during the active recovery frames of the preceding swing while holding a directional stick tilt toward the nearest secondary enemy.
Understanding hit-stun thresholds is vital when managing groups of unarmored foes. The first two hits of Logan's Light Slash chain deal light physical damage but apply an immediate stagger effect, interrupting enemy wind-ups and forcing them into a locked defensive stance. The third hit executes a dual-claw cross-slash that widens Logan's lateral strike arc, hitting adjacent targets standing within a 180-degree forward cone. Instead of letting the fourth hit trigger its slow overhead finisher, high-level players use the third hit's impact frame as a transition point into dynamic utility maneuvers.
To maintain unbroken pressure across a crowd, practice the "Branching Light String" method. Hit target A twice with light slashes to lock them in hit-stun, then instantly pivot your movement stick 90 degrees toward target B and press light attack again. Logan will execute his third light strike as a high-speed lunging sweep toward target B, extending his combo multiplier, keeping multiple enemies soft-locked in hit-stun, and preventing any single adversary from initiating a projectile or grenade attack sequence.
3. How to Execute Heavy Cleaves and Shield Breakers for Armor Penetration
As you progress into high-security facilities and mutant-hunting operative camps, standard light slashes will bounce off heavy riot shields, cybernetic body armor, and genetically reinforced elites. Heavy Cleaves are designed specifically to shatter posture meters and strip armor plates. Executing a Heavy Cleave requires charging the heavy attack button for 12 to 20 frames, causing Logan to pull his arms back before driving both adamantium claws forward in a devastating thrust that bypasses standard frontal blocking stances.
Armor penetration relies on understanding the enemy's Posture Gauge—represented by a grey bar beneath their health indicator. Light attacks reduce this gauge slowly, but a fully charged Heavy Cleave instantly drains up to 60% of an elite’s posture. When an enemy shield user raises their barrier, immediately execute a directional Heavy Cleave combined with a forward dodge-step. This "Guard-Breaker Lunge" forces Logan to slide under the enemy's shield line, driving his claws directly into their exposed footing and causing an instant guard-shatter animation that opens them up to airborne launchers.
To avoid taking damage while charging heavy strikes in dense crowds, you must master the "Heavy Charge Dodge-Cancel." If an incoming red-flash unblockable attack manifests while you are holding down the heavy attack button, do not release the button to attack. Instead, tap the dodge button while keeping the heavy attack button depressed. Logan will instantly cancel his heavy charge animation into a low-profile invincibility-frame (I-frame) roll, allowing you to reposition behind the attacker and immediately resume charging the Heavy Cleave from a safe angle.
4. How to Utilize Precision Dodge-Canceling and Frame-Splicing for Continuous Mobility
In Marvel’s Wolverine, standing still for more than a second is a guaranteed recipe for death. High-level combat requires absolute mobility through precision Dodge-Canceling and Frame-Splicing. Every attack animation in Logan’s kit consists of three distinct phases: Start-Up Frames, Active Impact Frames, and Recovery End-Lag Frames. Dodge-canceling involves tapping the dodge button the exact millisecond an active impact frame registers, instantly cutting off the slow recovery end-lag and resetting Logan’s character model back to a neutral, mobile state.
Frame-splicing takes this concept further by substituting standard dodge rolls with offensive ability cancels. Instead of dodging away to end a recovery animation, you splice a Claw Lunge or Upper-Cut Launcher directly onto the tail end of an active hit. For example, when executing a heavy finisher that normally leaves Logan stuck in a two-second ground-stab recovery animation, press the Claw Lunge command on the impact frame. Logan will instantly cancel the ground-stab end-lag, launching himself across the arena to strike a distant sniper without wasting a single millisecond in recovery motion.
Managing your Invincibility Frames (I-Frames) during dodge-cancels is critical when dealing with overlapping automatic firearm support. A standard directional dodge grants 12 continuous I-frames during which Logan is completely immune to physical bullets and explosive blast radii. By chaining light attack -> dodge cancel -> light attack -> dodge cancel in a rhythmic 1-2 cadence, you create an almost unbroken sequence of active strike frames and invincibility windows, allowing Logan to slice through dense crossfire without taking a single hit point of health decay.
5. How to Initiate Airborne Juggles and Launch Sequences for Single-Target Isolation
When facing overwhelming ground forces equipped with heavy melee weapons and ground-shatter shockwaves, the safest combat zone is the air. Single-target isolation via Airborne Juggles allows Logan to scoop a dangerous high-priority target—such as a sniper, rocketeer, or commander—up into the air, holding them in an extended aerial combo where ground-based melee units cannot reach or interrupt you. Initiating an airborne launch requires executing a charged Heavy Uppercut (Holding Heavy Attack while tilting the stick backward) or performing a Parry-Launcher counter-strike.
Once the target is launched into the air, immediately double-tap the jump button to execute an Adamantium Leap, locking Logan onto the airborne enemy at the peak of their arc. While airborne, your attack sequence shifts to a specialized aerial light-string kit consisting of three rapid claw-slashes that suspend both Logan and the target in mid-air, defying gravity through momentum buffering. To prevent the target from falling back to the ground prematurely, space your aerial light taps slightly apart—roughly 150 milliseconds between inputs—to maximize air-time and damage output.
To conclude an airborne juggle sequence with maximum tactical efficiency, you must choose between two distinct finisher routes: the Aerial Ground-Slam or the Mid-Air Throw Directional Yeet. Pressing heavy attack at the end of an aerial string executes the Ground-Slam, driving Logan's claws into the target's chest and slamming them down into the floor to create a high-impact shockwave that knocks down nearby ground units. Alternatively, pressing the grapple button at the apex of the juggle allows Logan to spin and throw the target directly into explosive barrels or off cliff edges for instant environmental eliminations.
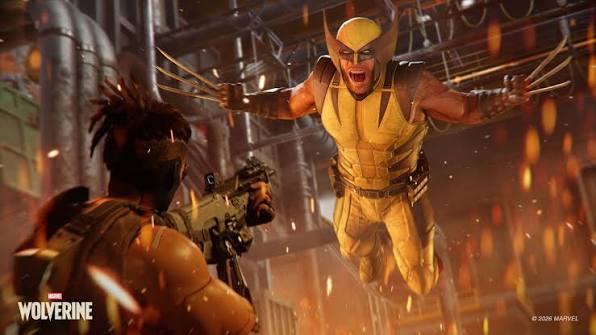
6. How to Construct Berserker Rage Loops: Managing Heat Meters and Feral Senses
Logan’s signature combat mechanic in Marvel’s Wolverine is the Berserker Rage System—a dynamic adrenaline bar that builds as you deal damage, execute perfect parries, and receive physical impacts. When the Berserker Meter reaches 100%, triggering Berserker Mode transforms Logan into an unstoppable whirlwind of violence, boosting his movement speed by 40%, increasing claw damage output by 100%, granting hyper-armor against light stagger attacks, and enabling rapid passive health regeneration. However, squandering your Berserker Rage on low-health grunts is a major strategic mistake; true masters learn to build continuous "Rage Loops."
Building a Rage Loop requires maintaining high combo efficiency to sustain the state indefinitely during long encounter waves. While in Berserker Mode, every successful claw strike refills a micro-portion of the active rage timer. By prioritizing high-density clusters of enemies and using wide-arc Heavy Cleaves, you can generate more rage energy than the meter naturally drains over time. Incorporating execution finishers—unlocked by filling an enemy's stun gauge—instantly restores 25% of your active rage gauge, allowing you to chain execute-heavy encounters from start to finish without ever dropping out of the berserker state.
Integrating Feral Senses into active combat provides an additional tactical layer for maintaining rage loops. Tapping the Feral Sense button briefly slows down time and highlights enemy weak points, structural hazards, and hidden sniper sightlines in vivid red overlays. During high-intensity brawls, pulsing Feral Senses for a fraction of a second allows you to instantly locate the highest-health target in the room, aligning your next Claw Lunge vector to keep your combo multiplier alive and your Berserker Rage bar fully supplied.
7. How to Execute Kinetic Claw Lunges and Long-Range Target Switching
The primary gap-closer in Logan’s kit is the Kinetic Claw Lunge—a high-velocity forward trajectory move that allows Logan to bridge massive spatial gaps across the battlefield in milliseconds. Activated by holding the target lock button and pressing the heavy attack input from a distance, Logan crouches low and propels himself through the air like an adamantium missile, driving his claws directly into a distant enemy's torso. Mastering the Claw Lunge is essential for suppressing long-range snipers, heavy gunners, and missile mercenaries before they can establish defensive crossfire perimeters.
To maximize the lethality of the Kinetic Claw Lunge, you must learn to execute "Target-Switch Lunge Chains." After eliminating an enemy with a close-range combo, do not wait for Logan to settle into his idle stance. Instantly snap your camera 180 degrees toward an enemy on the far side of the arena, hold lock-on, and initiate the Claw Lunge. Logan will instantly leap from the body of his fallen opponent, traveling across the room to strike the new target before they can raise their rifle to aim. Chaining five or six lunges back-to-back creates a high-speed blitzkrieg effect that completely trivializes ranged enemy formations.
The Claw Lunge can also be upgraded with "Impale Drag Mechanics" to turn ranged enemies into human shields. By holding the grapple button during the impact phase of a long-range lunge, Logan does not stop upon hitting the target; instead, he drives his claws deep into their chest and continues sliding forward, using the enemy's body to absorb incoming automatic fire from secondary gunners. At the end of the slide, tap heavy attack to flip the impaled enemy over your shoulder, slamming them into the oncoming gunners to knock the entire squad off their feet.
8. How to Weaponize the Environment: Wall Pins, Impalements, and Structural Takedowns
An elite combatant in Marvel’s Wolverine treats the surrounding environment as a dynamic extension of Logan’s lethal toolkit. Every concrete pillar, electrical junction box, sharp rebar projection, high-voltage panel, and cliff edge in Insomniac’s detailed arenas can be utilized to execute rapid environmental takedowns that bypass standard enemy health pools entirely. Utilizing environmental hazards requires precise spatial positioning, forcing enemies against vertical surfaces using heavy directional knocks before triggering contextual finishers.
Wall Impalements are the most reliable environmental takedown for mid-tier elites. When an enemy is standing within two meters of a solid wall or structural pillar, execute a directional Heavy Sweep aimed toward the surface. The impact force will knock the enemy backward into the wall. If you press the grapple button instantly upon wall contact, Logan will leap forward, pinning the target to the concrete with both Adamantium Claws. This deals immense structural damage, applies an extended lock-stun, and leaves the target completely defenseless to follow-up light attack shreds.
Interactive hazard nodes provide immediate crowd control against clustered mercenary squads. Look out for glowing environmental cues highlighted in yellow during Feral Sense sweeps—such as suspended cargo crates, high-pressure steam pipes, and electrical transformers. Firing a quick claw-flick or throwing an enemy directly into an electrical panel causes an immediate area-of-effect (AoE) explosion, shocking up to four adjacent targets, stripping their armor plates instantly, and setting up the entire squad for rapid multi-target finisher executions.
9. How to Troubleshoot Combo Drops, Hyper-Armor Elites, and Crowd Pressure
Even expert players will encounter high-stress combat situations where combo chains stall, elite enemies activate hyper-armor states, or overwhelming crowd pressure pins Logan into a corner. Understanding how to diagnose and recover from these tactical breakdowns in real time is critical for surviving on hard difficulty modes. The three most common causes of combat failure are: getting hit during heavy recovery frames, misreading unblockable attack visual cues, and getting trapped against geometry by multiple heavy units.
When an elite enemy activates Hyper-Armor—indicated by a glowing red aura around their body—they become completely immune to standard hit-stun from light attacks. Attempting to execute a light combo string on a hyper-armored elite will result in them swinging right through your attacks, dealing massive damage to Logan. The moment you spot a red hyper-armor aura, instantly abort your offensive string by executing a backward Dodge-Roll or a Feral Step. Switch your strategy strictly to Parry-Counters and Charged Heavy Cleaves, as these are the only moves capable of breaking hyper-armor animations.
If you find yourself cornered against a wall with your health bar in critical condition, activate your "Panic Reset Protocol." Do not attempt to fight your way out with basic swings. Instead, tap Feral Senses to trigger a brief slow-motion window, identify the nearest open space or elevated ledge, and execute an instant Wall-Jump or Kinetic Claw Lunge toward an enemy at the perimeter of the crowd. This instantly breaks the corner trap, repositions Logan into open space, grants temporary dodge I-frames, and provides room to build your health back up using rapid siphon attacks.
10. How to Execute Advanced Flow-State Sequences: The Continuous Adamantium Loop
The absolute pinnacle of combat mastery in Marvel’s Wolverine is the execution of the "Continuous Adamantium Loop"—a seamless, unbroken combat rhythm that weaves light slashes, heavy guard-breaks, aerial juggles, dodge-cancels, claw lunges, and environmental execution finishers into a single flowing ballet of destruction. Reaching this flow-state requires moving past conscious button processing and operating purely on muscle memory, reading enemy animation telegraphs two steps ahead of time.
To execute a textbook Continuous Adamantium Loop, initiate the engagement with a max-range Kinetic Claw Lunge targeting an edge sniper. Immediately upon impact, execute a Light-1, Light-2 string, then Dodge-Cancel backward to avoid a shotgun burst from an approaching grunt. As you exit the dodge I-frames, trigger a Heavy Uppercut launcher to send the shotgun grunt into the air, double-tap jump for an Adamantium Leap, and execute a 3-hit aerial light juggle string. End the juggle with an Aerial Throw, tossing the grunt directly into an armored elite on the ground below.
As Logan lands back on the floor, instantly trigger a Charged Heavy Cleave on the staggered elite to shatter their remaining posture bar, execute a contextual Wall-Pin Finisher to eliminate them, and use the resulting Berserker Meter gain to activate Berserker Mode. From this state, chain back-to-back target-switched Claw Lunges across the remaining grunts, canceling every final impact frame with a lateral dodge to maintain absolute invincibility. By maintaining this rhythmic sequence, you achieve absolute combat perfection—clearing entire arenas without taking a single hit point of damage while maintaining a maximum combo rating.
Mastering combat in Marvel’s Wolverine transforms Logan from a simple brawler into an unstoppable kinetic force. By treating his adamantium claws not as blunt tools, but as surgical instruments governed by frame data, cancellation windows, trajectory calculations, and environmental awareness, you unlock the absolute highest ceiling of Insomniac's combat engine. Practice your dodge-cancels, respect hyper-armor telegraphs, keep your combos airborne when ground pressure surges, and sustain your berserker rage loops across every wave. With these technical strategies embedded into your muscle memory, you will slice through every mercenary unit, cybernetic elite, and boss encounter with absolute, lethal perfection.